

I never did get around to finish painting this lovely thing, so this series is part of my resolution to complete unfinished projects! (yes, I know, don't mention the terrain for a minute!)
Working with resin requires some special attention tools and skills. You can check out Forge Worlds own Resin Guide which has lots of information about tools and methods you may need.

After about 2 months, I had decided that a running pose was definately needed in order to show and exploit the mobility of the model. However, not content with that I then decided to fully explore the poseability of the model by introducing other lines of travel! So the desired pose would hopefully not only represent a titan running, but also turning in its run at the same time, giving us forwad and sideward motion whilst also adding a twist into the bargain! Sounds complicated but in my minds eye I had worked out the exact look I was after!

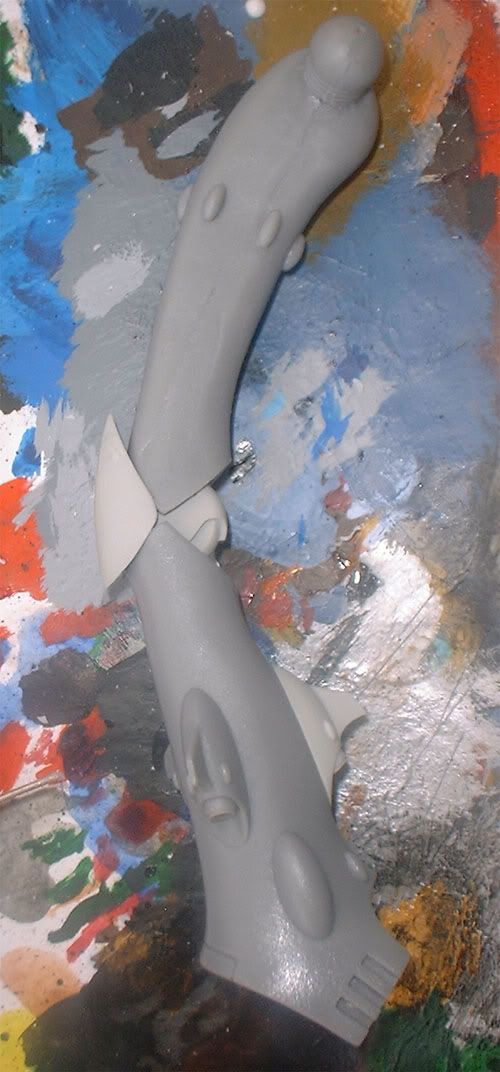 I decided the best place to start was with the legs. They would set
up the dynamism. I chose to start at the knees, then work down to the
feet and up to the ankles. Hopefully the reason for this will become
clearer as you see more.
I decided the best place to start was with the legs. They would set
up the dynamism. I chose to start at the knees, then work down to the
feet and up to the ankles. Hopefully the reason for this will become
clearer as you see more.Additionally, starting with simple sections helps warm you up to the modelling processes and gets you accustomed to the model you are making!
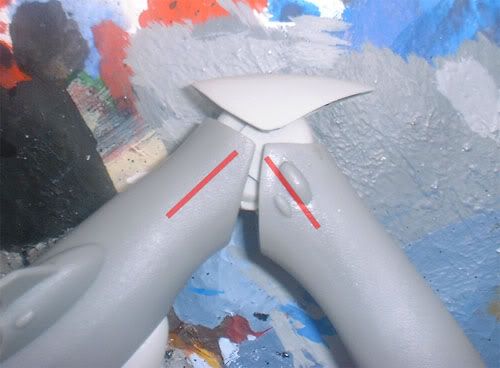
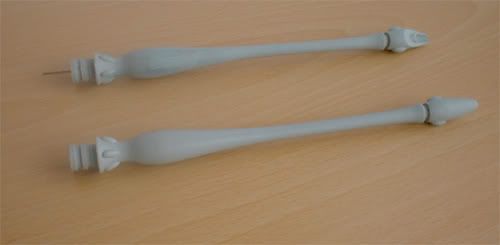
I bought some large paperclips to use as pins, and throughout these images I will show you where they are used. Starting with the right leg, which would be straight, I planned for two pins, one either side of the knee. As the legs would be taking the full weight of the model it is important to ensure that they are strong and secure.
 Throughout the build I was using a mix of super glue and PVA glue. Alone, superglue can become very brittle and allow parts to break off,
but combined with PVA glue it seems to gain extra strength and is
noticably less brittle. As a side, the mix tends to dry faster too. I
tended to add a bit of PVA to go between the superglue and then
bring them together for the glues to spread and mix. Where pins were involved, these were primarily
glued using just super glue, with the main surfaces glued with a
mixture.
Throughout the build I was using a mix of super glue and PVA glue. Alone, superglue can become very brittle and allow parts to break off,
but combined with PVA glue it seems to gain extra strength and is
noticably less brittle. As a side, the mix tends to dry faster too. I
tended to add a bit of PVA to go between the superglue and then
bring them together for the glues to spread and mix. Where pins were involved, these were primarily
glued using just super glue, with the main surfaces glued with a
mixture. At this point, the two legs were left to dry. It's important to try to avoid working on parts as your enthusiasm can sometimes work against you!
If you have any questions then feel free to ask!
A mixture of superglue and PVA glue? I'd never of thought of using those two types of glue together and not heard anyone else mention it either. I will have to give it a go (Chaos Warhound titan still sitting in a box...). Do you put just a thin coat of PVA on the one surface?
ReplyDeleteLook forward to seeing the titan come together as well, lovely model and the dynamic pose you are looking at will show it off nicely.
I first came across the glue mix on a random forum (I can't even remember which). The principle was that the PVA softens the superglue just enough to remove the brittleness whilst providing a stronger bond (also, be aware that superglues become more brittle at low temperatures!).
ReplyDeleteThe chemistry of it all is beyond me, but in my research I found out that it mostly has something to do with the fact that superglue and PVA glue in "different" ways. At a molecular level, superglue forms strands, but doesn't work as a big blob... whilst PVA is the opposite. The water content in PVA also acts as an accelerant so you end up with a fast drying and doubly strong connection.
THIS GUY, tries to explain it.
Enhance and secure this by heavily scoring the surfaces to be glued.
Obviously, being less brittle is good because parts are less likely to simply drop off (old superglue has a habit of doing this!) I was bold (or stupid) and tried it out without testing it first! Seems to work... I mean, it's still in one piece!
And finally the method you use to get the mix might depend on the pieces you are gluing (like their shape, ease for work etc). You want to be able to create a mix of the glues... I often tended to but superglue on both parts, then a blob of PVA around the base of the pin. This gives you some flexibility in positioning before you squeeze the parts together and the glues mix into their strong bond. You have to work super fast!
I hope this makes sense... as usual, I suggest tests first!
Very cool, Oink! I'm really looking forward to seeing how it turns out.
ReplyDeleteAnother interesting tidbit about the superglue/pva mix - if you drizzle out a pool of white glue, and drip superglue into it, the water in the white glue reacts with the superglue to form weird ropy pustulent looking bubbles as it dries. I've used it to great effect to make slime trails and bubbling pools - Worth experimenting with on terrain pieces and suchlike.
Hey Oink. I just chanced upon this and could use a lot of help but all the pictures are dead... any way I can get help on this? I really wanna build my Revenant well!
ReplyDelete