

If you're familiar with woodwork joinery techniques then you'll probably spot some similarities here!
Gluing
Whilst it is possible to create cuts to allow boards to be joined without needing glue, Foamboard (AKA Foam core) can normally be easily glued together. This can be augmented in a number of ways, some of which I will cover in future posts.
Superglues can actually melt away the foam and so should be avoided. You can use superglue to stick other things to the board, such as card, or other details, but just don't get any on the foam!
So what's the answer? General purpose PVA glue... it really is that simple! Well... yes and no. You can also use Hot Glue from a glue gun to strengthen some connections, but if you don't have access to this then there are a number of alternative options; aside from joint strengthening you can use a "No more nails" type product. Incidentally, these come in very handy when you are looking to glue things like plastic details to the board!
Whilst you now know the glue you should use you still need to know HOW to join pieces. The tips below will help you learn how to make strong and neat connections.
Simple Rabbet Joint
A Rabbet Joint can be used to neatly connect two pieces of foamboard together into a corner. It is a much better join than a simple Butt Joint because it looks much neater whilst also being much stronger. The reason it is stronger is because there is more surface area between the two pieces for your glue!
To make a simple Rabbet Joint is easy. All you need to do is mark a line in from the edge of one of your pieces which the thickness of your material (1). Here, I have marked 5mm in because I am using 5mm Foamboard. Then you can cut through the first layer of card, before carefully cutting through the foam. Avoid cutting (or even scoring) the second layer of card. You can then use your blade to trim away the foam, or alternatively use your ruler to scrape it out! (2) You will then be able to fix the two pieces together and you won't see any of the foam filler!
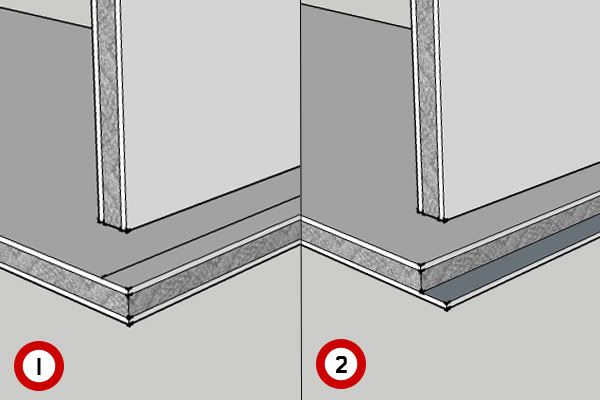

You will still need to cover the foam at the top & bottom to hide it, but you won't need to do the edge!
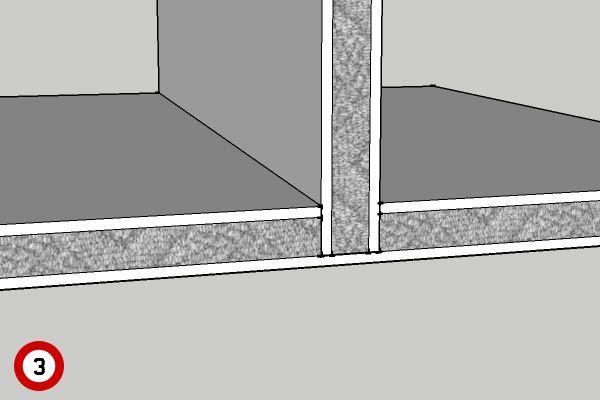
A Housed Joint is similar in principle to the Simple Rabbet Joint except that it is used away from the edge of a section. It is great because it offers strength, saves on cutting out independent panels and even gives you a way of retro-fitting additional pieces! What's more, is this type of join can be adapted to allow you to join foamboard with other materials at right angles, such as card or plasticard. Be aware of the principles for the Simple Rabbet Joint by marking the correct position for your foam board piece, remembering it has a thickness (1).

As with the Rabbet Joint, be aware of how the junction affects overall dimensions. You can see that the added surface area with this type of joint means it will be MUCH stronger than a simple Butt Joint (3), as such, it is usually well worth the extra time and effort.
Summary
I've covered all of the above joints together because they are all made using simple cutting techniques. There are a range of more difficult junctions which involve angled cuts. Whilst they can be more difficult to achieve, they offer some of the neatest junctions. So next time I will cover angled cutting and joining.
Hopefully these diagrams have been useful and easy to understand, they are definitely clearer than trying to take clear pictures of white foamboard!
This is a wonderful resource, I'll definitely be checking in on your articles for reference.
ReplyDeleteStill checking in? It's been useful to me too, and I hope you're still getting help from it!
DeleteThat's absolutely superb, mate!
ReplyDeleteI've always been entranced by joinery but I know very little about it...and I never would've thought of this in a lifetime!
THANK YOU!
Great article, Oink! This series you're doing has some incredibly handy tips - can't wait to read more!
ReplyDelete@ Matthew, thanks for the encouragement - it says a lot considering the wonderful tutorials and showcases you have over at the midwestmonsterlab!
ReplyDelete@ Drax, glad this can be helpful, it's good to know that what you're putting out there is actually useful and not just one chap blathering on in the night!
@ Mordian, stay tuned for more articles and tips coming your way... I'll also be putting some of these things into practice with simple terrain building in the near future so people can see practical applications.
Rabbit and House - got it ~ Thanks :)
ReplyDeletePretty sure I'll always remember this thread when I think of these types of join.
What's the best way to join two pieces edge to edge?
ReplyDeleteThank you so much for your article. I have a present to give to someone, however the original box was dented up pretty bad. So I bought one of those white gift boxes. I decided to strengthen up the sides and bottom by making a box out of foam board and sticking it into the white box. I was looking at joint boxes and didn't feel I could get it exactly. So when I saw this article, I went right to work and it turned out great. Thank you again for printing this.
ReplyDeleteWell these seems to be great but is it hard and strong technique to be followed. I always prefer my foam board purchase from http://www.foamboardsource.com/ shall i proceed with their products in same way or please guide me some places to buy..
ReplyDeleteSimply wish to say your article is as astonishing. The clarity in your post is simply great, and I could assume you are an expert on this subject. Same as your blog i found another one Sohman Epoxy .Actually I was looking for the same information on internet for
ReplyDeleteHSC 7600 and came across your blog. I am impressed by the information that you have on this blog. Thanks a million and please keep up the gratifying work.
Nice Blog....Digital Standee Works in Chennai
ReplyDeleteACP Signage Board Works in Chennai
ED Sign Boards Manufacturers in Chennai
Glow Sign Board Manufacturers in Chennai
Hi thhanks for posting this
ReplyDelete