

Unfortunately, whilst it is an easy material to use, it is difficult to master and there are a number of quick and simple tips and techniques to help overcome (or avoid) potential issues! Hopefully I can cover some basics here that you will find helpful, as I'm sure taking time to write this out will help me get re-acquianted!
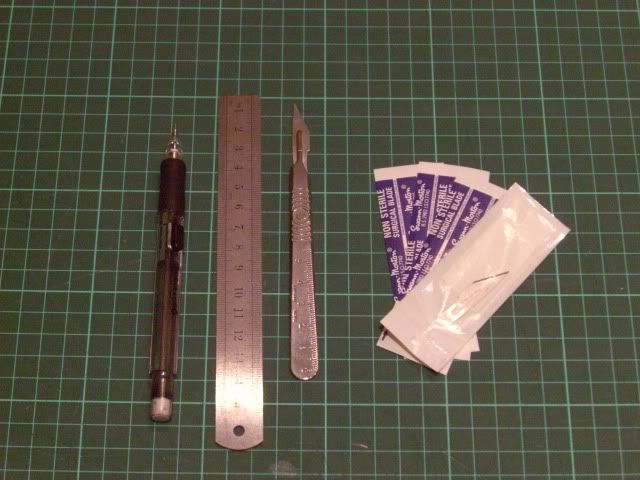
Foamboard comes in a variety of standard thicknesses. The thickness you choose will usually depend on the application. For my terrain, a 5mm thick board is perfect. However, it doesn't stop at the board itself, here is a list of additional tools and items you will need in order to carry out basic cutting work;
- A new scalpel with a sharp blade. If it's not sharp, don't bother.
- A set of spare blades. To replace blunt blades.
- A metal ruler. Anything less than this will get cut up by your sharp blade! (+ other measuring instruments)
- A cutting matt. See above!
- A fine point pen / pencil. The finer you can get it, the more accurate you will be... A clutch pencil (mechanical) will keep a fine point and mean you won't have to keep sharpening! It's also easy to erase mistakes!
Marking Out
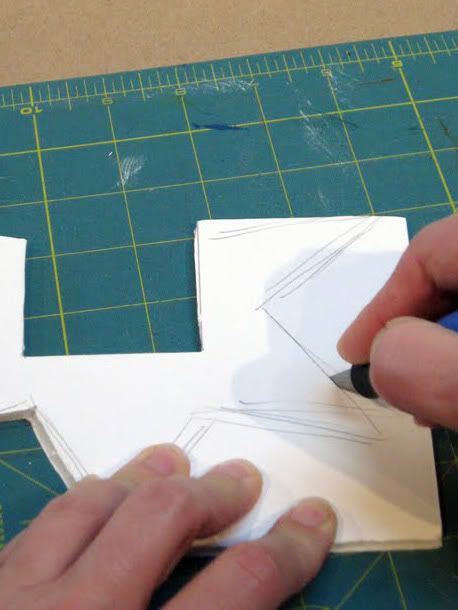
Before making any cuts it is important to mark out the shape you want on the face of the foamboard. Use your ruler and other measuring instruments to accurately measure, and your sharp pencil to mark the board. The best tip here is to not apply much pressure. You only need a light line to follow and you do not want to dent the board!
Use a set square or angle measurer as needed in order to work out accurate angles. I usually mark new lines at angles using a series of dots before grabbing my ruler and joining them all up! Generally speaking you want to try and draw every line in one go to prevent untidy overlaps.
It is even easier if you make a template by printing the shape you want onto paper. This is even more advisable if you need multiples of one shape. You can then print and trace the template as many times as needed and will save you lots of time in the long run.
Cutting a Straight Line
The most basic of things is to cut a straight line. If you can do that, then you are not far away from creating panels, which can be glued together to make blocks (or boxes), which themselves are only a step away from being a terrain piece!
To cut a line you should hold your metal ruler firmly along the marking. Be aware of how the thickness of your blade relates to the thickness of the pencil. Ideally, you should cut ON the drawn line, not one side or the other of it.
 Start by holding the blade vertically at the top of the line and piercing the top layer of the foamboard. Do not try to cut all the way through in one go. Take your time and slowly pull the blade down along the line, angling the blade as you go to increase the cutting surface. Do not apply a lot of pressure, the first cut will run through the top layer. You will then repeat this cut so that you go through the foam (and score the bottom layer) whilst a final cut will go through the bottom layer. It is important to keep your ruler still throughout this process or you'll make a right mess of things!
> NEVER EVER EVER USE SCISSORS TO CUT FOAM BOARD! <
Covering Edges
There are two main ways that you can conceal the foam edges of cut shapes. The first and simplest is to cut strips of card the thickness of your foamboard. This can then be glued on exposed edges using PVA glue. You will probably want to prepare a store of strips for use as you go, or you can add this all at the end. The important thing though is that the strips are accurate and straight.
The second method can be used where two pieces of board meet. Rather than butting the two pieces, you can create a lap joint by trimming back the inside board layer and inner foam. Simply measure the thickness of your material and start the process of cutting a straight line. Stop short of trying to cut through the bottom layer.
I can cover this more in more detail when I talk more about joining Foamboard together.
Cutting Mistakes (or "Why I Can't Ork!")
 This harlequin is showing us a category of errors. We can see that the
shape has not been marked out accurately, nor are they using a ruler to
guide the blade! This will result in a very untidy result that will only ever make an Ork proud...
This harlequin is showing us a category of errors. We can see that the
shape has not been marked out accurately, nor are they using a ruler to
guide the blade! This will result in a very untidy result that will only ever make an Ork proud...These things are all easily remedied by following the advice above. Of course, the hap-hazard nature of Greenskin terrain means that the exacting principles above are the main reason why I can't Ork!
However, despite there are three main mistakes people make when making cuts;
1: Applying too much pressure.
Apart from dulling blades quickly, applying too much pressure will usually result in creased or folded cutting edges. This is not always an issue, but for fine work can result in untidiness. The best way to avoid this is to be aware that you want to use multiple cuts to get through the board.
2: Using a dull blade:
If your blade is not sharp then you will tear the paper and / or the foam centre. A dull blade will easily ruin your work despite how careful you may try to be. be sure to have spare blades and replace your blade once you start to see the warning signs.
3: Cutting at an angle.
This is usually my main problem. It is very easy to make your cuts at an angle. This normally results in a piece that has chamfered edges! The only remedy I have found for this is to pay close attention to the angle you are holding the blade at. It is possible to fix chamfered edges, but this is not as easy as avoiding the problem in the first place.
Great article - glad to see your rule one is sharp blades, it's so easy to think "just a couple more cuts will be okay", and then muck it up. Usually a good idea to lay in a store of bandages as well... :)
ReplyDeleteI'm interested to hear is you have any tricks for cutting curved lines, that's been my downfall on numerous occasions.
I was just going to comment about adding a bandaid to the list of needed supplies at the start.
DeleteThank you, there are a few tips for cutting curves which I can get on to in later articles... similarly, there are a range of products out there which can help you cut straight lines (both at upright or 45degree angles). Again, I'll probably cover these in more detail later.
ReplyDeleteThx for the article, great work and very helpfull.
ReplyDeleteDo you, or anyone else, know how the prevent the carboard from bending after glueing the wals, balsawood etc ...
1. Foamboard warping: you're more than likely using waterbased glue... Wets the board, its warps. Either use heavy books on the project while it dries (if its flat, obvs.) -OR- dont use waterbased glue. :) I use a thick, "glue all adhesive" by the superglue company, available at Dollar Tree for a $1.
ReplyDelete2. Dull Blades: oftentimes, the tearing or "pilling" of the foam layer when cutting...is a matter of GLIDE, NOT DULLNESS. Pull the blade thru a wax candle to lubricate, and continue cutting.
3. Curves: get the piece cut out, I call this the rough cut. Next, angle your blade..not really 45° but you get the idea..and cut the each edge again. You want to "undercut" all edges so that you dont see any of the foam sides. FINALLY, SAND ALL EDGES! I use a 250grit if I want to alter, smooth out the general shape (I.e. my wobbly circles) and finially a 400grit.
Hot knifes are great for cutting foam board. Smooth straight cuts every time and only cost about $15.
ReplyDeleteOlfa knives are generally easy to handle and effortless equipment to cut foamboards and sheets. Moreover economic tool to use and replace. Have a look at...Foamboardsource
ReplyDeleteSimply wish to say your article is as astonishing. The clarity in your post is simply great, and I could assume you are an expert on this subject. Same as your blog i found another one Sohman Epoxy .Actually I was looking for the same information on internet for
ReplyDeleteHSC 7600 and came across your blog. I am impressed by the information that you have on this blog. Thanks a million and please keep up the gratifying work.